 How to change/install an XML blogger/blogspot template
This post features a tutorial on how to change and install a new XML blogger/blogspot template/skin. The other method is changing the HTML blogger/blogspot template, which is not covered in this post.
Why have a skin/template?
This his how you change the xml blogger/blogspot template.
You are done. View your blog and you may add widgets now.
NOTE: Sometimes, depending on the type of template, if your previous blog had widgets that could not be carried over to the new template that is about to be installed, you will be prompted to confirm that some of these widgets are about to be removed, just click on the words 'confirm and delete'. You will add them later.
Sometimes you can not even save the new template because of more than one unique ID's in your template, such as the Archive, HTML, Heading, Labels or Adsense, so you will have to cancel, go to your old template, on 'Layout', click on ‘Page Elements’ and start to Remove each individual widgets.
There is no straight way to back up your widgets the way you back up a template, but you can search online and learn 'how to back up blogger widgets'.
Why have a skin/template?
- A new template/skin helps to make your blog look unique, possibly attractive and probably add some features that will enhance navigation and easy reference for readers.
- Compared to restricted WordPress, blogs that are hosted in blogger/blogspot allow some degree of manipulation, this is a good platform for developer and 'curious georges'
- You can learn some of these tips by clicking on the labels 'HowTo/PUGU' an 'Tweaks/Tips/Tricks' on the right column of this blog. Alternatively, you may use the search box provided above.
This his how you change the xml blogger/blogspot template.
- Go online and choose a new XML Template
- With your mouse, right click on it to "save target as" or "download" the chosen template on your computer (note the NAME and PLACE on your computer where you save the new xml template)
- Now Login in your blogger
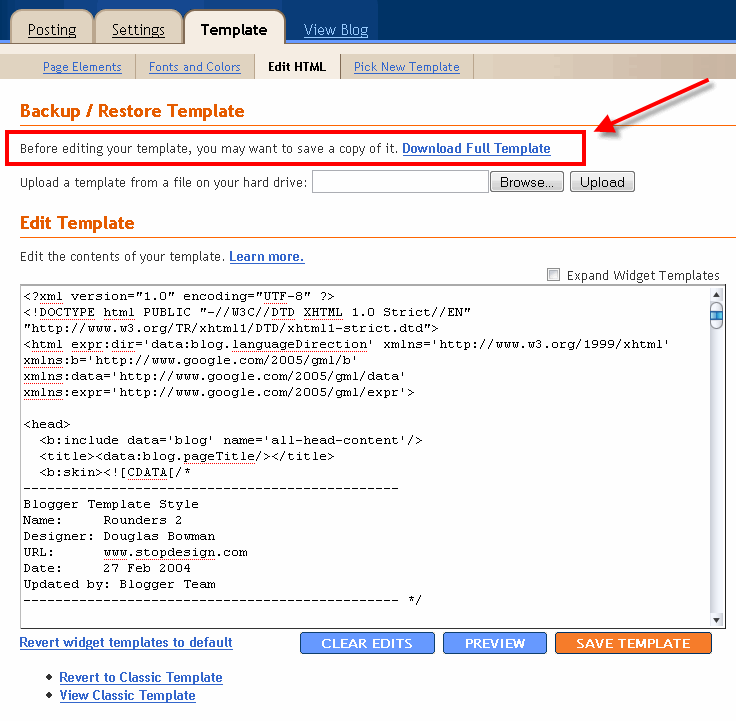
- In the Dashboard, click Layout then click Template then click Edit HTML
- Remember to back up template your existing template, click on the words 'Download Full Template'
- Click on the words Browse which will open a window for you to pick the template (choose the new template you saved in step 2 above)
- Click on the words Upload
You are done. View your blog and you may add widgets now.
NOTE: Sometimes, depending on the type of template, if your previous blog had widgets that could not be carried over to the new template that is about to be installed, you will be prompted to confirm that some of these widgets are about to be removed, just click on the words 'confirm and delete'. You will add them later.
Sometimes you can not even save the new template because of more than one unique ID's in your template, such as the Archive, HTML, Heading, Labels or Adsense, so you will have to cancel, go to your old template, on 'Layout', click on ‘Page Elements’ and start to Remove each individual widgets.
There is no straight way to back up your widgets the way you back up a template, but you can search online and learn 'how to back up blogger widgets'.


0 feedback :